OOC-GCC特性介绍与使用说明

Posted on Sat, 11 Jun 2011 22:47:50 -1100

OOC-GCC 特性介绍

•核心部分仅仅是"宏",所以编译的时候更加灵活.

•两层宏定义,底层的"宏"完全采用英文全称,表意清晰.同时严格控制每个宏的定义,尽力做到不烂用.

•对于OO的模拟有构造也有析构,宏的定义具有对称性,同时符合语言规则,如表述表示 类的"名词" + 表示方法的"动词+名词".

•类的定义多数采用全开放的形式,这也使得现在的版本和VC兼容.

•方便和C++的配合.

•相对完整的类空间与实例(对象)空间的模拟,类空间的构造和析构通过类似引用计数的方法对开发者"透明".

•相对完整的单根继承的模拟,无需的在子类的构造/析构函数中显示地调用父类的构造/析构函数.

•和主流C编译工具兼容,无论GCC或是M$的编译工具都可无warning编译通过.

    ----实际测试为GCC 32bit 4.5.2 MinGW环境以及Ubuntu环境,64bit的找别人帮忙测试过,可能会有几个关于size_t的warning

    -----微软的是编译器  32-bit C/C++ Optimizing Compiler Version 15.00.30729.01 for 80x86

    -----微软的是编译器  32-bit C/C++ Optimizing Compiler Version 15.00.30729.01 for 80x86

•提供较为便利的调试层(仅针对GCC),

    ----提供更加方便的断言宏

    ----提供针对纯C的异常捕获机制的模拟

    ----提供和堆内存分配的日志监测

    ----提供仪表函数(就是监控每一个函数的调用)日志监测

    ----提供手动调用日志监测

    ----日志输出格式较为简洁,配合addr2line及graphviz等工具可以较为方便的生成图表

•提供一些常规的函数(这一部分是独立出来的)

•文件结构较为简洁,且功能上比较独立,同时有OOCfg.h中定义了一些宏开关方便一些特性的开启与停用.

•提供独立的单文件宏OOC.h,方便Release版的使用.

•提供了一些测试用例,以及在win下配合MinGW及VC编译用的批处理,*nix的GCC使用时改一下即可
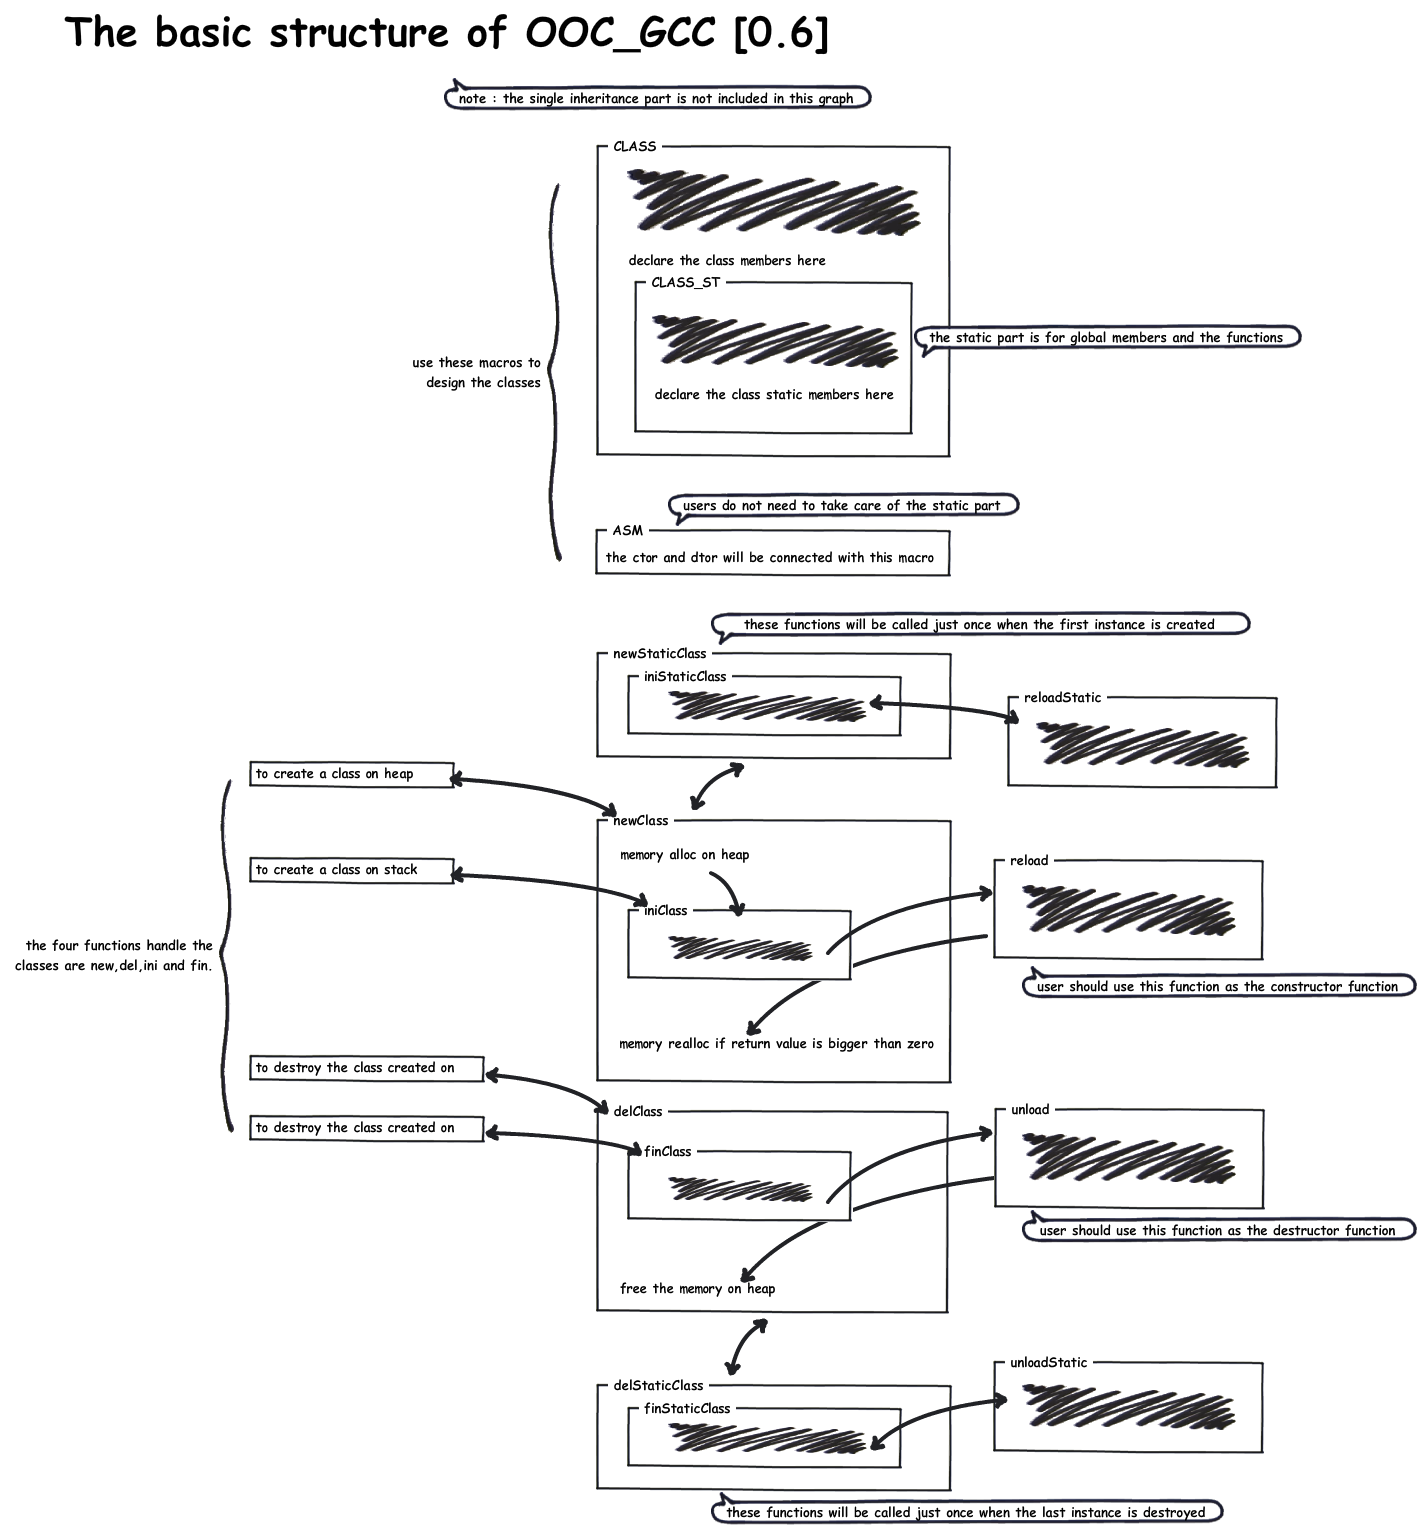
-------------------------------------------------------------------------------------------------------------------------------------

关于OOC-GCC中宏的使用

类的设计(模块化的编程应在.h文件中使用)

 
假定有一个名为"A""类"

CLASS(A){
    ......  这里为实例成员
    STATIC(A);
    ......  这里是类成员(实际结构体为struct _StA,并被重定义为StA)
};

假定有一个名为"B"的继承了上面"B""类"

CLASS_EX(A,B){
    .......
    STATIC_EX(A,B); 
    .......
};

注意继承时,前面是父类,后面是要定义的子类.

类的构造与析构(模块化的编程应在.c文件中使用)

static int A_reload(A *THIS,void *p){
        THIS->.... 这里使用第一个参数来初始化实例成员
        return 0;
}
static int A_reloadSt(StA *THIS,void *p){
        THIS->.... 这里使用第一个参数来初始化类成员
        return 0;
}
static int A_unload(A *THIS,void *p){
        THIS->.... 这里使用第一个参数来析构实例成员
        return 0;
}
ASM(A,A_reload,A_unload,A_reloadSt,NULL)
注意上面最后一个参数为类成员的析构
使用NULL是为了说明无需某个函数时,可以不设置

类的使用

普通类"A"的使用
A *a=NEW0(A);  //声明第一个A的实例时调用StA和A的构造,
               //以后再声明A的实例只调用A的构造
StA *fA=ST(a);
fA->someFunc(a,someParam);
DELETE0(a);    //销毁A的实例时调用A的析构
               //当销毁显存的最后一个A的实例时,
               //调用A和StA的构造

带有继承的类"B"的使用
B *b=NEW0(B);   //注意父类的构造会自动调用
StB *fB=ST(b);
fB->someFunc(b,someParam);
StA *fA=ST(b);
fA->someFunc(b,someParam); 使用父类的方法
DELETE0(b);  //无需知道b的具体类型时A或B,都会调用正确的析构
             //如果是A的指针,则调用A的析构,如果是B的指针则调用B和A的析构

--------------------------------------------------------------------------------------------------------------------------------------------------------

关于OOC-GCC中单根继承的说明

假设我们定义四个类,A,B,C,D,并且后面的类继承前面的类,则有


CLASS(A){
        STATIC(A);
};
static int A_reload(A *THIS,char *name){
        printf("%s\n",__FUNCTION__);
        return 0;
}
static int A_unload(A *THIS,void *PARAM){
        printf("%s\n",__FUNCTION__);
        return 0;
}
static int A_reloadSt(StA *THIS,char *name){
        printf("%s\n",__FUNCTION__);
        return 0;
}
static int A_unloadSt(StA *THIS,void *PARAM){
        printf("%s\n",__FUNCTION__);
        return 0;
}
ASM(A,A_reload,A_unload,A_reloadSt,A_unloadSt)

CLASS_EX(A,B){
        STATIC_EX(A,B);
};
static int B_reload(B *THIS,char *name){
        printf("%s\n",__FUNCTION__);
        return 0;
}
static int B_unload(B *THIS,void *PBRBM){
        printf("%s\n",__FUNCTION__);
        return 0;
}
int B_reloadSt(StB *THIS,char *name){
        printf("%s\n",__FUNCTION__);
        return 0;
}
static int B_unloadSt(StB *THIS,void *PBRBM){
        printf("%s\n",__FUNCTION__);
        return 0;
}
ASM_EX(A,B,B_reload,B_unload,B_reloadSt,B_unloadSt)

CLASS_EX(B,C){
        STATIC_EX(B,C);
};
static int C_reload(C *THIS,char *name){
        printf("%s\n",__FUNCTION__);
        return 0;
}
static int C_unload(C *THIS,void *PCRCM){
        printf("%s\n",__FUNCTION__);
        return 0;
}
static int C_reloadSt(StC *THIS,char *name){
        printf("%s\n",__FUNCTION__);
        return 0;
}
static int C_unloadSt(StC *THIS,void *PCRCM){
        printf("%s\n",__FUNCTION__);
        return 0;
}
ASM_EX(B,C,C_reload,C_unload,C_reloadSt,C_unloadSt)

CLASS_EX(C,D){
        STATIC_EX(C,D);
};
static int D_reload(D *THIS,char *name){
        printf("%s\n",__FUNCTION__);
        return 0;
}
static int D_unload(D *THIS,void *PDRDM){
        printf("%s\n",__FUNCTION__);
        return 0;
}
static int D_reloadSt(StD *THIS,char *name){
        printf("%s\n",__FUNCTION__);
        return 0;
}
static int D_unloadSt(StD *THIS,void *PDRDM){
        printf("%s\n",__FUNCTION__);
        return 0;
}
ASM_EX(C,D,D_reload,D_unload,D_reloadSt,D_unloadSt)

上面的代码再调用相关的函数是会打印出对应的__FUNCTION__,

        printf("\n*****************NEW A\n");
        A *a=NEW0(A);
        printf("\n*****************NEW B\n");
        B *b=NEW0(B);
        printf("\n*****************NEW C\n");
        C *c=NEW0(C);
        printf("\n*****************DEL C\n");
        DELETE0(c);
        printf("\n*****************DEL B\n");
        DELETE0(b);
        printf("\n*****************DEL A\n");
        DELETE0(a);
        printf("\n*****************NEW D\n");
        D *d=NEW0(D);
        printf("\n*****************DEL D\n");
        DELETE0(d);

如果像上面这样调用,则会有如下输出

*****************NEW A
A_reloadSt
A_reload

*****************NEW B
A_reload
A_reloadSt
B_reloadSt
B_reload

*****************NEW C
A_reload
B_reload
A_reloadSt
B_reloadSt
C_reloadSt
C_reload

*****************DEL C
C_unload
B_unload
A_unload
A_unloadSt
B_unloadSt
C_unloadSt

*****************DEL B
B_unload
A_unload
A_unloadSt
B_unloadSt

*****************DEL A
A_unload
A_unloadSt

*****************NEW D
A_reloadSt
A_reload
A_reloadSt
B_reloadSt
B_reload
A_reloadSt
B_reloadSt
C_reloadSt
C_reload
A_reloadSt
B_reloadSt
C_reloadSt
D_loadSt
D_load

*****************DEL D
D_unload
C_unload
B_unload
A_unload
A_unloadSt
A_unloadSt
B_unloadSt
A_unloadSt
B_unloadSt
C_unloadSt
A_unloadSt
B_unloadSt
C_unloadSt
D_unloadSt

构造的时候遵循先父再子,析构的时候遵循先子再父.

另外关于静态部分的使用,在某个类第一次使用时自动的调用静态构造

当销毁某个类的最后一个实例时自动的调用静态析构

Hello,OOC World![Chap2Sec1-3][GFDL]

Posted on Sat, 28 May 2011 20:24:56 -1100

项目地址(点击超链) OOC_GCC 

注意:OOC_GCC 源码以LGPL发布,文档为GFDL,文档相关测试用例为GPL3

Web版文档发布暂定为项目托管地SVN仓库,WikiPage,"这里",以及我的博客.

转载请注明出处


Hello,OOC World!


                ---- 原始作者: 大孟  pingf0@gmail.com


                                          崇 尚 开 源 , 热 爱 分 享 !  


这份Tutorial性质的文档其实很扯的,非要啰嗦些用C语言进行面向对象开发的基本内容


版权说明

License Type: GFDL

Copyright (C) 2011-2011 Jesse Meng  pingf0@gmail.com
Permission is granted to copy, distribute and/or modify this document under the terms of the GNU Free Documentation License, Version 1.3 or any later version published by the Free Software Foundation;with no Invariant Sections, no Front-Cover Texts, and no Back-Cover Texts.A copy of the license is included in the section entitled “GNU Free Documentation License”.

OOC-GCC为开源软件,遵循LGPL3协议发布,本手册为相关配套文档,采用GFDL协议发布,本手册中提供的相关示例代码以及简化版的OOC-LITE 需遵循GPL3协议.任何使用请遵循相关协议, 如有和协议相冲突的特殊要求, 请联系我[ pingf0@gmail.com ]

第二章 { 伸展运动 }


1. < CLASS,CTOR,DTOR >

宏是一个十分强大的特性,某些人的观点是通过宏实际上我们可以创立一个新的语言!当然个人认为只是形式上罢了.不过通过宏,代码看起来真的可以很简洁,很强大.比如下面所介绍的,将用一些简单的宏让C代码看上去有点C++的味道.


#include "OOC.h"
CLASS(A){
        int a;
        void (*showA)(A *);
};
static void A_showA(A *THIS){
        printf("the value of obj's a is %d\n",THIS->a);
}
CTOR(A){
        THIS->a=100;
        THIS->showA=A_showA;
}
DTOR(A){
        THIS->a=0;
        THIS->showA=NULL;
}
int main(){
        A * obj=newA();
        obj->showA(obj);
        delA(&obj);
        return 0;
}

这个例子中用到了三个宏,分别是CLASS,CTOR(对应CONSTRUCTOR),DTOR(对应DESTRUCTOR). 如果把他们展开,其实和前面"对称之美"一节中的代码是一样的.但又不一样,因为使用了宏,可读性大大提高, 而代码量大大减少(上面的代码和上一章中的对比减少了约1/3)!这只是一个简单的类的模拟,如果类比较多且继生关系比较复杂, 那么节省的代码量还是相当可观的.


不过这里还是要再次强调一下,宏是好东西,但如果滥用反而会使可读性大大降低,难懂不说,还不利于以后的维护.

关于本手册中的宏的设计,我尽量做到简单明了,易于记忆.


闲话少扯,现在具体来看一下CLASS,CTOR和DTOR宏具体是怎么实现的.

#include <stdio.h>
#include <stdlib.h>
#define CLASS(Type) \
typedef struct _##Type Type; \
void ini##Type(struct _##Type *); \
void fin##Type(struct _##Type *); \
Type * new##Type(); \
void del##Type(struct _##Type **); \
struct _##Type

#define CTOR(Type) \
Type * new##Type() { \
    Type *THIS; \
    THIS=(Type*)calloc(1,sizeof(Type)); \
    if( NULL==THIS ) { \
        return NULL; \
    } \
    ini##Type(THIS); \
    return THIS; \
} \
void ini##Type(Type * THIS)

#define DTOR(Type) \
void del##Type(Type **THIS) { \
    fin##Type(*(THIS)); \
    free(*(THIS)); \
    (*(THIS))=NULL; \
} \
void fin##Type(Type *THIS)

没错,就是这么简单!(当然如果你觉得这都算复杂了话,还是不要继续下面的文字了,这是我目前能做到的最简化的宏了)

下一节将会闲扯一些为什么这样设计,以及仅仅是这样还有那些不足.


2. < 从CLASS说起 >


C语言中直接使用结构体其实是件很麻烦的事,因为每次声明都要使用额外的"struct"来声明.一些初学C的人,特别从VC开始入门那些,总会分不清什么是C,什么是C++.特别是在struct声明这一块也特别容易按照懒省事儿的方法来写.但是我们应该知道一些事情----真正的纯C编译器如果不事先typedef一下是无法声明一个自定的结构体的实例的.

下面看一小段代码,演示如何将typedef与struct来结合.

typedef struct {int a;} A;
int main(){
        A obj;
        ojb.a=1;
        return 0;
}

关于typedef的语法,如果不牵扯结构体,是比较好理解的,比如"typedef int bool;"就是将原有的int型重定义为一个全新的bool型,尽管本质上它们是一样的.而一旦与结构体结合,就略微有些绕了.为了简化说明它的语法,上面的代码我做了一些处理,一是结构体本身匿名话,二是简化结构体内容并将其写到一行之内.这样我们看上去会十分明了还是"typedef struct ... A;"的形式,而"..."中我们其实定义了一个结构体的内容,只不过这个结构体本身是"匿名的".

更加常规的写法是,像下面这样.

typedef struct _A A;
struct _A{
        int a;
};
int main(){
        A obj;
        ojb.a=1;
        return 0;
}

CLASS宏中,也使用了和上面类似的做法来简化struct声明实例时的步骤.

#define CLASS(Type) \
typedef struct _##Type Type; \
void ini##Type(struct _##Type *); \
void fin##Type(struct _##Type *); \
Type * new##Type(); \
void del##Type(struct _##Type **); \
struct _##Type

CLASS宏不但简化了struct声明实例的工作,还声明了"四大函数"(将函数声明放在最前面是有好处的,它会让编译器在一开始就知道有这么些类型的函数).这四个函数其实是"两队",一对是ini和fin打头,另一对是new和del打头.其分别对应栈内存和堆内存上实例的构造与析构.

而CLASS宏的最后则是一个全开放的形式(这里的全开放是指某个宏不需要语气配合相对应的"截止"宏来保护一段代码),开头和结尾都是用C语言自身的"{"和"}"符合来指明.

在下一节,将会介绍用于构造和析构的CTOR和DTOR宏,而它们则封装了"四大函数"的具体实现.


3. < CTOR & DTOR >

这一节来说一下用于模拟构造函数的宏CTOR以及用于模拟析构函数的宏DTOR.先回顾下CTOR的定义.

#define CTOR(Type) \
Type * new##Type() { \
    Type *THIS; \
    THIS=(Type*)calloc(1,sizeof(Type)); \
    if( NULL==THIS ) { \
        return NULL; \
    } \
    ini##Type(THIS); \
    return THIS; \
} \
void ini##Type(Type * THIS)

假设我们还是要定义一个名为"A"的类,那么上面的代码中我们要把"Type"换成"A",并删除"##"(注意##在宏的使用中表示"连结").这样的话,我们就看到了一个完整的"newA"函数和一个没有写完的"iniA"函数(请参考上一节最后的"四大函数"一说).

"iniA"函数实际上是真正的构造函数,其负责一个"类"成员的初始化.但其没有写完,因为具体如何初始化是由我们自己说了算的,我们可以在其后面紧跟着写上"{ THIS->a=1; }"(假设A类中有int型成员变量a),这样就完成了一个简单的构造函数的实现.

我们要注意的是iniA函数要接受一个类实例指针,然后再对其进行初始化.也就是说这个函数本身是不涉及内存的分配的,我们可以传入一个指向栈内存的指针,也可以传入一个指向堆内存的指针,它都会对其进行"初始化"!但是如果我们使用堆内存,还要先定义一个指针,并指向一块malloc返回的内存再传入ini函数,这多少有些麻烦.为了方便的使用堆内存,上面的CTOR宏还给出了一个new函数,这里仍以一个名为"A"的类为例.newA就将malloc函数和iniA函数和二为一!我们使用的时候只需像"A * obj=newA();"这样即可,这大大方便了堆实例的使用!

不难发现,newA就是对iniA的一个简单封装,其做的工作就是"1.分配堆内存.2.调用ini函数.3.返回一个指向已分配内存的指针."这三块工作,这是有章可循的.也正因此,我们将其完全封装在CTOR宏之中.使用的时候我们几乎感觉不到它的存在,直接new就好.

下面再来看一下用于析构的DTOR宏,

#define DTOR(Type) \
void del##Type(Type **THIS) { \
    fin##Type(*(THIS)); \
    free(*(THIS)); \
    (*(THIS))=NULL; \
} \
void fin##Type(Type *THIS)

这里面定义了"四大函数"中用于析构的del函数和fin函数.其分别对应着前面的new函数和ini函数.我们可以对比着前面的讲述来理解.ini函数是真正的构造函数,fin函数是真正的析构函数.new是ini函数的一个封装,其做的具体工作就是先malloc在ini,del则是fin函数的一个封装,其做的具体工作是先fin再free.

当然因为有了new函数和del函数这样针对堆内存的封装,ini函数和fin函数更多的时候是与栈内存来配合使用的.

总的来看CTOR宏和DTOR宏,将涉及内存分配的部分独立出来可谓好处多多,不但可以更加自由且明确的使用栈内存和堆内存,还使得用于构造和析构的宏也能保持和前面CLASS宏一样的"全开放性",同时CTOR宏和DTOR宏几乎是完全对称的,这意味着我们只需理解一半,另一半就迎刃而解了.


OOC-GCC基本结构图[0.6][终于有时间整点相关的文档了]

Posted on Thu, 07 Apr 2011 18:44:24 -1100

这个图片主要是说明OOC_GCC中关于类的宏的基本结构[v0.6]

[注:此图不包括单根继承部分]

http://code.google.com/p/ooc-gcc/downloads/list

注意编译时要开启-fms-extensions[GCC 4.5]或-fplan9-extensions[GCC 4.6]

OOC_GCC Basic Structure

OOC-GCC新的测试用例[0.6]

Posted on Fri, 25 Mar 2011 04:57:50 -1100

这个例子主要用来掩饰如何实现继承关系[v0.6]

http://code.google.com/p/ooc-gcc/downloads/list


//
#include "inc/core/OOStd.h"
 
CLASS(Human){
    int age;
    int gender;
    STATIC(Human)
    iFn sayHi;
};
ASM(Human,NULL,NULL,NULL,NULL) 
 
CLASS_EX(Human,Mom){    
    STATIC_EX(Human,Mom)  
};
int Mom_sayHi(Mom * THIS){
    printf("Hi,Mom age:%d gender:%s\n",THIS->age,THIS->gender?"male":"female");
    return 0;
} 

int Mom_reload(Mom * THIS,void *PARAM){
    printf("%s %p\n",__func__,THIS);
    THIS->age=36;
    THIS->gender=0;
    return 0;
}
int Mom_unload(Mom * THIS,void *PARAM){
    printf("%s %p\n",__func__,THIS);
    return 0;
}
 
int Mom_reloadStatic(StaticMom * THIS,void *PARAM){
    printf("%s %p\n",__func__,THIS);
    THIS->sayHi=(void *)Mom_sayHi;
    return 0;
}
int Mom_unloadStatic(StaticMom * THIS,void *PARAM){
    printf("%s %p\n",__func__,THIS);
    THIS->sayHi=NULL;
    return 0;
}
ASM_EX(Human,Mom,Mom_reload,Mom_unload,Mom_reloadStatic,Mom_unloadStatic)

CLASS_EX(Mom,Kid){
    int id;
    STATIC_EX(Mom,Kid) 
};

int Kid_sayHi(Kid * THIS){
    printf("Hi,Kid%d age:%d gender:%s\n",THIS->id,THIS->age,THIS->gender?"male":"female");
    return 0;
}

int Kid_reload(Kid * THIS,void *PARAM){
    static int id=0;
    printf("%s %p\n",__func__,THIS);
    THIS->age=3;
    THIS->gender=1;
    THIS->id=++id;
    return 0;
}
int Kid_unload(Kid * THIS,void *PARAM){
    printf("%s %p\n",__func__,THIS);
    return 0;
}
 
int Kid_reloadStatic(StaticKid * THIS,void *PARAM){
    printf("%s %p\n",__func__,THIS);
    THIS->sayHi=(void *)Kid_sayHi;
    return 0;
}
int Kid_unloadStatic(StaticKid * THIS,void *PARAM){
    printf("%s %p\n",__func__,THIS);
    THIS->sayHi=NULL;
    return 0;
}
ASM_EX(Mom,Kid,Kid_reload,Kid_unload,Kid_reloadStatic,Kid_unloadStatic)
 
int main(){
     
    printf("\n-----------\n");
    Mom * m=newMom(NULL);
    printf("\n-----------\n");
    StaticMom *stm=ST(m);
    Kid *k1=newKid(NULL);
    printf("\n-----------\n");
    Kid *k2=newKid(NULL);
    printf("\n-----------\n");
    Kid *k3=newKid(NULL);
    printf("\n-----------\n");
    stm->sayHi(m);
    printf("\n-----------\n");
    StaticKid *stk=ST(k1);
    stk->sayHi(k1);
    printf("\n-----------\n");
    stk->sayHi(k2);
    printf("\n-----------\n");
    stk->sayHi(k3);
    printf("\n-----------\n");
    delKid(&k1,NULL);
    printf("\n-----------\n");
    delKid(&k2,NULL);
    printf("\n-----------\n");
    delKid(&k3,NULL);
    printf("\n-----------\n");
    delMom(&m,NULL);
    printf("\n-----------\n");
    
    return 0;
}
正确的输出为,
-----------
Mom_reloadStatic 003E2BF0
Mom_reload 003E2BD0

-----------
Mom_reload 003E2C18
Mom_reloadStatic 003E2C40
Kid_reloadStatic 003E2C40
Kid_reload 003E2C18

-----------
Mom_reload 003E2C80
Kid_reload 003E2C80

-----------
Mom_reload 003E2CA8
Kid_reload 003E2CA8

-----------
Hi,Mom age:36 gender:female

-----------
Hi,Kid1 age:3 gender:male

-----------
Hi,Kid2 age:3 gender:male

-----------
Hi,Kid3 age:3 gender:male

-----------
Kid_unload 003E2C18
Mom_unload 003E2C18

-----------
Kid_unload 003E2C80
Mom_unload 003E2C80

-----------
Kid_unload 003E2CA8
Kid_unloadStatic 003E2C40
Mom_unloadStatic 003E2C40
Mom_unload 003E2CA8

-----------
Mom_unload 003E2BD0
Mom_unloadStatic 003E2BF0

-----------

Time Elapsed
Seconds : 0
Microseconds : 0
另外内存分配检测Log输出为
[,][;]
+,0x003E2BD0,20;
+,0x003E4CF0,8;
+,0x003E2BF0,32;
+,0x003E2C18,28;
+,0x003E2C40,52;
+,0x003E2C80,28;
+,0x003E2CA8,28;
-,0x003E2C18;
-,0x003E2C80;
-,0x003E2C40;
-,0x003E2CA8;
-,0x003E2BF0;
-,0x003E4CF0;
-,0x003E2BD0;
!,0;
最后的0表示分配的都释放了,而前面的数据可以配合graphviz来实现一些图表
具体文件见项目地址,我一直比较懒,懒得用svn,git这些工具,因为这个目前依旧是自己自娱自乐
P.S.
注意编译时要开启-fms-extensions[GCC 4.5]或-fplan9-extensions[GCC 4.6]

Proteus中8259的仿真[无dos,纯手工]

Posted on Wed, 16 Mar 2011 14:05:32 -1100

因为研究生复试的需要所以最近折腾了下8086的汇编, 
不过proteus总是没有我预期的完美[可能也跟和谐的版本有关] 
下面是折腾8259的一些总结,不过有一些问题,希望知道的能予以指正 
 
电路搭建,基于自带的例子 (原文件名:8259_1.png) 

 
程序源码 (原文件名:8259_2.png) 

 
断点设置 (原文件名:8259_3.png) 

 
仿真1 (原文件名:8259_4.png) 

 
仿真2 (原文件名:8259_5.png) 


另外,一些问题罗列如下 
-.我用的老王的77sp2和谐,不过逻辑仿真器貌似用不了啊 
-.8259模型需要改一下[加几个字符]才能用于仿真 
0.一开始会莫名其妙的产生一个终端,一般位于前16字节,所以我的程序在那里也设置了捕获的proc,要不然会跑飞,不知为何 
1.下一次触发时才会相应正确的中断,而当前相应的为上一次的?不过Simulation Log里的信息倒是正确的 
2.级联模式,次级的irr不会自动清除,至少我觉的应该自动清除的,导致响应时会被进制,当然可能是我程序的问题 
3.软件触发的中断没问题,直接int xx出来的中断都可以正确的响应,个人感觉要么是我程序的问题,要么是8259模型的问题 
4.Proteus中仿真用exe和com格式的都可以,我的程序是使用masm的,顺带试了下mingw套件里的gas汇编,com格式输出时也是可以的 
  不过没法调试,即使-gstabs加上了也不行. 

*.上面的问题可能是本人程序上的错误,希望熟悉8086汇编的人能指正一下 
工程文件ourdev_623172B3W6H8.rar(文件大小:32K) (原文件名:8086 Demo Board.rar)  [放在ourdev上了]

源程序

.MODEL  SMALL
 
io8259_main_addr equ 0600H        
io8259_sub_addr  equ 0800H        

.8086
.code
        io8259_std1_init macro base,icw1_val,icw2_val,icw4_val
                mov dx,base
                mov al,icw1_val  
                out dx,al
                
                mov dx,base+2
                mov al,icw2_val
                out dx,al
                
                mov al,icw4_val
                out dx,al
        endm
        io8259_std_init macro base,icw1_val,icw2_val,icw3_val,icw4_val
                mov dx,base
                mov al,icw1_val  
                out dx,al
                
                mov dx,base+2
                mov al,icw2_val
                out dx,al
                
                mov al,icw3_val
                out dx,al
                
                mov al,icw4_val
                out dx,al
        endm
        
        setup_int macro int_irq,int_cs,int_ip
                push di
                push ds
                mov di,0
                mov ds,di
                mov di,(int_irq)*4
                mov word ptr ds:[di],int_ip
                mov word ptr ds:[di+2],int_cs
                pop ds
                pop di
        endm
        setup_ints macro int_irq,int_cs,int_ip
                setup_int int_irq,int_cs,int_ip
                setup_int (int_irq+1),int_cs,int_ip
                setup_int (int_irq+2),int_cs,int_ip
                setup_int (int_irq+3),int_cs,int_ip
                setup_int (int_irq+4),int_cs,int_ip
                setup_int (int_irq+5),int_cs,int_ip
                setup_int (int_irq+6),int_cs,int_ip
                setup_int (int_irq+7),int_cs,int_ip
        endm

        intxx proc far
                iret
        intxx endp
        intl1 proc far
                iret
        intl1 endp
        intl2 proc far
                iret
        intl2 endp
        intl1_s proc far
                iret
        intl1_s endp
        intl2_s proc far
                iret
        intl2_s endp


.startup
        cli
       
        setup_ints 00h,seg intxx,offset intxx
        setup_ints 08h,seg intxx,offset intxx
        setup_ints 10h,seg intxx,offset intxx
        setup_ints 18h,seg intxx,offset intxx
        
        setup_int 30h,seg intl1,offset intl1
        setup_int 31h,seg intl2,offset intl2
        setup_int 40h,seg intl1_s,offset intl1_s
        setup_int 41h,seg intl2_s,offset intl2_s
   main:
        io8259_std_init io8259_main_addr,\ 
                        11h,30h,04h,13h
        ;io8259_std1_init io8259_main_addr,\ 
                        ;13h,30h,03h
   slave:
        io8259_std_init io8259_sub_addr,\ 
                        11h,40h,02h,03h

        sti
        jmp $

.data
.stack
END
编译链接选项[masm] 
ml /c /Zd /Zi sample.asm  
link16 /CODEVIEW sample.obj,sample.exe,,,nul.def 


Win32下AT&T汇编Hello world教程

Posted on Tue, 08 Mar 2011 18:50:26 -1100

因为复试的需要,学习了下和汇编相关的东西,

虽然当年学过微机原理,不过没下功夫[其实是老师水,教材水啊....]

现在只能恶补了

这两天玩了下masm,nasm,gas,当然只是搭建了基本的环境,跑了下基本的实例

因为gas相关文档比较稀缺,所以本篇日志记录一些和其相关的

主要目的是备份一下,省的以后忘了

顺便说一下,我用的是和谐的WinXP系统

1.环境搭建,从sf下MinGW套件,这一步不在赘述

2.基本的程序

先来一个最简单的hello world,不过用到了c运行时,

当然也可以写那种纯粹的保护模式的,不过比较麻烦,现在也没深入研究,故暂不讨论

.section .data
out_text:
    .asciz "hello world"
.section .text
.globl _main
_main:
    pushl $out_text
    call _printf
    pushl $0
    call _exit
这里用到了c运行时的main,exit,printf函数,因为win32的原因多加了个下划线
3.编译
as test_win.s -o test_win.o -gstabs 
ld test_win.o -o test_win.exe -Le:/mingw/lib -lcrtdll
-gstabs保留了调试相关的符号表
-Le:/mingw/lib -lcrtdll链接了c运行时,注意mingw路径是我机器上的
4.运行

上面那个是带有调试信息的,可以看到strip后只有2K了
5.调试
注意不要strip

这里面要注意的是设置断点时的*号,以及main和_main的区别
另外查看寄存器可用"i r"指令
6.com版本的hello world
这个不管怎样还是大了点,想想当年学习微机原理的伪dos程序貌似是按字节论的,
下面就来个com版的hello world
(1)代码test.s
.code16
.text
    movw %cs, %ax
    movw %ax, %ds
    movw %ax, %es
    movw %ax, %ss
     
    movw $11, %cx
    movw $0x1301,%ax
    movb $0x07,%bl
    movw $0,%dx
    movw $outstring,%bp
    int $0x10
    jmp .
outstring:
    .asciz "hello world"
注意.code16是很有必要的
(2)编译
as test.s -o test.o 
ld test.o -Ttext 0x0100 -o test.exe
objcopy.exe -R .pdr -R .comment -R .note -S -O binary test.exe test.com
最后的objcopy将编译后的按binary输出成.com格式的
[另外如果跳过第二部exe生成,直接从.o生成.com也是可以运行的,不过对比发现有1bit的异常引起了输出字符的乱码
具体原因我就不去纠结的探索了,如果修改了那一比特,字符显示就正常了]
另外链接时的-Ttext 0x0100也可以用如下lds文件来控制
SECTIONS
{
. = 0x0100;
.text : {*(.text)}
}
同时链接时的选项应该为-Ttest.lds
(3)输出

(4)修改
此时如果ls -l一下会发现有将近4k之巨,这是因为填充了很多的0,用HxD这样的软件把结尾的0
给干掉再看其大小

看看最后的那个文件52字节,终于瘦身成功了!


SlickEdit完美解析Qt4

Posted on Mon, 31 Jan 2011 08:05:49 -1100

这两天折腾Qt,为了让SE更好的解析它,还是花了些时间的,下面的图片展示了SE强大的自动补全功能

Qt类方法的补全

编写类方法时的补全

this指针补全

this指针补全

ui类补全[设计namespace解析]

头文件补全

浏览QString源代码

使用GDB调试Qt程序

解析ui布局文件[xml]


OOC-GCC 简介

Posted on Tue, 25 Jan 2011 05:08:08 -1100

OOC-GCC 概述


下载地址

http://code.google.com/p/ooc-gcc/downloads/list


其实这还是我对用C语言进行OO方式编程的一些尝试,最早的时候我在SF建了一个叫JCOOP的项目,后来搬到GOOGLE CODE


不过随着不断的改进,也对OO有了进一步的理解,


在这里先谈一下现在我对OO的理解,


所谓OO,本质是对象驱动型编程模式,其核心在于抽象,并将代码封装使之更易于复用.


所以说你用结构体来抽象描述某种事物并不意味着你的代码就不是OO的,所以说用C也是可以写出OO的代码的.


有人或许会更仔细的区分OO和OB,认为只有支持了多态,RTTI这些儿玩意儿的才是OO,其它的只能是OB


[※O→oriented,B→based]


我不想去争论这些没有太大意义的概念,因为C语言本身不是OO的语言.


不过话说回来,计算机的执行过程在逻辑上都本质是过程化的,因为汇编是过程的,机器码也是过程的.


而那些OO的语言只不过是编译器帮助完成了一些迷惑性的工作,帮你完成了内存分布,访问控制等的跑龙套的活而已.


无论何种类型的语言,执行过程都会遵循一定的顺序,所以说像C这类语言骨子里并不输给CPP,JAVA,


反倒是一些很高级的语言,引入了过多的语法糖,深入学习后总会感到有些瑕疵.


下面言归正传,


用C去模拟OO[这里说的OO包括OB和OO,是指一种思想,从对象入手的编程方式],首先要模拟的就是其最核心的东西.


虽然Ruby,CPP的技巧繁多,但依我现在来看,OO最重要的东西不是多态这些,而是如何去设计一个类,以及如何区别其他类.


本质上来说就是类的结构设计,类的构造与析构,如何调用类的成员.


对于用C模拟OO来说,类结构自然就是struct,普通成员依旧是普通成员,方法就是函数指针.至于虚函数与否,就是指向的问题了.


在目前的OOC-GCC中,通过宏class...eclass来定义一个类,通过ctor...ector和dtor...edtor宏来完成构造和析构.

而调用的时候则要用到new...del宏以及ini...fin宏,如果类在堆上,使用new...del,如果类在栈上,使用ini...fin.


至于继承的问题,用struct当然是struct中套struct了,而类型系统以及类型的转换,额外动手写是必须的,不过一种比较好的思路是


用union来包含不同的类型,并以一个变量来区分不同的类型,目前还没有弄这一块,因为个人觉得这样做太冗杂了.


OO本来就是简化编程的,弄得复杂了就不好了.


在最近的尝试中,还试着来模拟foreach这样的行为,但是目前的实现需要他typeof这种类别的关键字的支持[或者__typeof__类似的]


下面举一个Iterator的例子,当然这个Iterator和别的语言的必须是有所不同的.


假定我们要构造一个描述集合的类B,一个描述元素的类N.


要使用我这里的Iterator,只需让B包含一个IterationBase[或用typedef后的IBase],让N包含一个IterationNode[INode]


具体的类,以及构造与析构如下


//类声明

class(B)
    IBase ibase;
eclass

//构造

ctor(B)
    ini0(IterationBase,&this->ibase);
ector

//析构

dtor(B)
    emptyzs
edtor

//////////////////

//类声明

class(N)
    INode inode;
    //这里v用来保存实际测试用的数据
    int v;
eclass

//构造

ctor(N)
    ini0(IterationNode,&(this->inode));
    this->v=(int)param;
ector

析构

dtor(N)
    emptyzs
edtor


下面给出测试用的main函数

int main (int argc, char *argv[])
{
     //声明部分

    Iterator itor;

    ini0(Iterator,&itor);

    N *n1=NULL,*n2=NULL,*n3=NULL,*n4=NULL;

    n1=new(N,(void *)111);

    n2=new(N,(void *)112);

    n3=new(N,(void *)113);

    n4=new(N,(void *)114);

    B *b;

    b=new0(B);


    //插入

    //

    //将n1..n4绑定到b,

    //注意append前两个是不需要next的

    //

    //第一次插入无论用append或prepend

    //都会使base中的指针指向插入的node

    itor.append(&b->ibase,&n1->inode);

    //以后每次的append或prepend都是针对

    //当前base中的cur指针的

    itor.append(&b->ibase,&n2->inode);

    //这里想要在整个base的尾部插入

    //所以后面的每次插入都需要next一下

    itor.next(&b->ibase);

    itor.append(&b->ibase,&n3->inode);

    itor.next(&b->ibase);

    itor.append(&b->ibase,&n4->inode);

    //

    //foreach遍历

    N *np=NULL;

    //哈哈 foreach 遍历 !

    foreach(np,b)

        printf("--%d",np->v);

    eforeach

    printf("\n");

    //反着再遍历一遍 !

    foreach_rev(np,b)

        printf("--%d",np->v);

    eforeach

    //

    //释放堆内存

    del0(N,&n1);

    del0(N,&n2);

    del0(N,&n3);

    del0(N,&n4);

    del0(B,&b);

    return(0);
}


正确的输出是

--111--112--113--114
--114--113--112--111

[※最后注明一下,OOC-GCC从名字上就能看出是针对GCC的,用C++的编译器肯定无法编译的

如果是其他纯C的编译器[最好支持C99扩展的],可能需要稍微修改一些,但量不会很大]


Lyrics--老男孩片尾曲

Posted on Sat, 13 Nov 2010 13:43:32 -1100


老男孩 

演唱:筷子兄弟


歌词[中英双语]
  [英文部分基本按照原片中字幕,有几处显而易见的错误已经修改]
  那是我日夜思念深深爱着的人啊
  I am deep in love with her, Thinking of her day and night
  到底我该如何表达
  But how can I express myself
  她会接受我吗
  And will she accept me
  也许永远都不会跟她说出那句话
  Maybe I'll never expose my heart to her
  注定我要浪迹天涯
  For I am always wondering about alone and homeless
  怎么能有牵挂
  How can I be on tenterhooks
  梦想总是遥不可及
  Dreams are but dreams
  是不是应该放弃
  Maybe I should give up
  花开花落又是一季
  Flowers bloom and fade again and again
  春天啊你在哪里
  But where is the spring for me
  青春如同奔流的江河
  Youth like a swift current
  一去不回来不及道别
  rushing by without saying good-bye
  只剩下麻木的我没有了当年的热血
  Leaving me behind numb, cold and spent
  看那漫天飘零的花朵在最美丽的时刻凋谢
  A beautiful flower faded at its prime time in spring
  有谁会记得这世界她来过
  But who cares if it ever lived in this world
  转眼过去多年时间多少离合悲欢
  Many years have elapsed in a brink of the eye
  Witnessing unions and departures joys and sorrows
  曾经志在四方少年羡慕南飞的雁
  The wondering boy envies the wild goose
  That flies to the south before winter comes
  各自奔前程的身影匆匆渐行渐远
  People go in different directions away and gone
  未来在哪里平凡啊谁给我答案
  But where is my future?Just simple ordinary days for me
  Oh,who can give me the answer
  那时陪伴我的人啊你们如今在何方
  Where are you,my friends?
  我曾经爱过的人啊现在是什么模样
  Are you still the same as the ones in my memory?
  当初的愿望实现了吗
  Have you realized your dreams?
  事到如今只好祭奠吗
  Maybe we'll let bygones be bygones
  任岁月风干理想再也找不回真的我
  However hard I may try, I cannot find my true self
  抬头仰望着满天星河
  A million stars are twinkling in the sky
  那时候陪伴我的那颗
  and I try to find out the one used to stay by me
  这里的故事你是否还记得
  Oh, my dear of yesterday,
  do you still remember the time we shared together?
  [solo间奏blablalba]
  生活像一把无情刻刀改变了我们模样
  Life is like a sculptor's graver cold and ruthless
  which has changed our looks
  未曾绽放就要枯萎吗
  Will the flower wither before it ever has a chance to bloom?
  我有过梦想
  But I used to have my dream
  [小重复前面的一段]
  青春如同奔流的江河
  Youth like a swift current
  一去不回来不及道别
  rushing by without saying good-bye
  只剩下麻木的我没有了当年的热血
  Leaving me behind numb, cold and spent
  看那漫天飘零的花朵在最美丽的时刻凋谢
  A beautiful flower faded at its prime time in spring
  有谁会记得这世界她来过
  But who cares if it ever lived in this world
  [小重复前面的一段]
  当初的愿望实现了吗
  Have you realized your dreams?
  事到如今只好祭奠吗
  Maybe we'll let bygones be bygones
  任岁月风干理想再也找不回真的我
  However hard I may try, I cannot find my true self
  抬头仰望着满天星河
  A million stars are twinkling in the sky
  那时候陪伴我的那颗
  and I try to find out the one used to stay by me
  这里的故事你是否还记得
  Oh, my dear of yesterday,
  do you still remember the time we shared together?
  [最后的煽情]
  如果有明天祝福你亲爱的
  If tommorow ever comes, I'll send my best wishes to you,my love.


每天一个小程序--Qt结合Designer快速进行快发

Posted on Tue, 02 Nov 2010 09:11:18 -1100

今天写一个小例子,用Qt快发一个简单电话簿

其运行结果如下图

主要需要完成的是一个ListDialog和一个EditDialog

ListDialog的头文件如下

#ifndef LISTDIALOG_H
#define LISTDIALOG_H
#include <QDialog>
#include "EditDialog.h"
#include "ui_listdialog.h"
class ListDialog : public QDialog {
    Q_OBJECT
public:
    ListDialog(); 
private slots:
    void addItem();
    void editItem();
    void deleteItem();
private:
    Ui::ListDialog ui;
};
#endif // LISTDIALOG_H
其cpp文件如下
#include "ListDialog.h"

ListDialog::ListDialog() : QDialog() {
    ui.setupUi( this );
    connect( ui.addButton, SIGNAL(clicked()), this, SLOT(addItem()) );
    connect( ui.editButton, SIGNAL(clicked()), this, SLOT(editItem()) );
    connect( ui.deleteButton, SIGNAL(clicked()), this, SLOT(deleteItem()) );
}

void ListDialog::addItem() {
    EditDialog dlg( this ); 
    if ( dlg.exec() == QDialog::Accepted )
        ui.list->addItem( dlg.name() + " -- " + dlg.number() );

}
void ListDialog::deleteItem() {
    delete ui.list->currentItem();
} 

void ListDialog::editItem() {
    if ( !ui.list->currentItem() )
        return;
    QStringList parts = ui.list->currentItem()->text().split( "--" );
    EditDialog dlg( this );
    dlg.setName( parts[0].trimmed() );
    dlg.setNumber( parts[1].trimmed() );
    if ( dlg.exec() == QDialog::Accepted )
        ui.list->currentItem()->setText( dlg.name() + " -- " + dlg.number() );
}
EditDialog的头文件如下
#ifndef EDITDIALOG_H
#define EDITDIALOG_H
#include "ui_editdialog.h"
#include <QDialog>
class EditDialog : public QDialog {
public:
    EditDialog( QWidget *parent=0 );
    const QString name() const;
    void setName( const QString& );
    const QString number() const;
    void setNumber( const QString& );
private:
    Ui::EditDialog ui;
};
#endif 
其cpp文件如下
#include "EditDialog.h"

EditDialog::EditDialog( QWidget *parent ) : QDialog( parent ) {
    ui.setupUi( this );
}
const QString EditDialog::name() const {
    return ui.nameEdit->text().replace("--","").trimmed();
}
void EditDialog::setName( const QString &name ) {
    ui.nameEdit->setText( name );
}
const QString EditDialog::number() const {
    return ui.numberEdit->text().replace("--","").trimmed();
}
void EditDialog::setNumber( const QString &number ) {
    ui.numberEdit->setText( number );
}
注意,这里面用到了使用Qt Designer生成的布局文件,在运行qmake时,qt会产生特别的makefile
通过该makefile,我们运行make时,还会调用uic来产生ui_xxx头文件,还会调用moc来产生所需的元对象所需的cpp文件
最后列出用Qt生成的Ui文件,保存时保存为*.ui文件即可用Qt Designer打开编辑了
listdialog.ui
<?xml version="1.0" encoding="UTF-8"?>
<ui version="4.0">
 <class>ListDialog</class>
 <widget class="QDialog" name="ListDialog">
  <property name="geometry">
   <rect>
    <x>0</x>
    <y>0</y>
    <width>401</width>
    <height>300</height>
   </rect>
  </property>
  <property name="windowTitle">
   <string>Phone Book</string>
  </property>
  <layout class="QGridLayout" name="gridLayout">
   <item row="0" column="0">
    <widget class="QListWidget" name="list"/>
   </item>
   <item row="0" column="1">
    <layout class="QVBoxLayout" name="verticalLayout">
     <item>
      <widget class="QPushButton" name="addButton">
       <property name="text">
        <string>Add new</string>
       </property>
      </widget>
     </item>
     <item>
      <widget class="QPushButton" name="editButton">
       <property name="text">
        <string>Edit</string>
       </property>
      </widget>
     </item>
     <item>
      <widget class="QPushButton" name="deleteButton">
       <property name="text">
        <string>Delete</string>
       </property>
      </widget>
     </item>
     <item>
      <spacer name="verticalSpacer">
       <property name="orientation">
        <enum>Qt::Vertical</enum>
       </property>
       <property name="sizeHint" stdset="0">
        <size>
         <width>20</width>
         <height>40</height>
        </size>
       </property>
      </spacer>
     </item>
     <item>
      <widget class="QPushButton" name="clearButton">
       <property name="text">
        <string>Clear All</string>
       </property>
      </widget>
     </item>
    </layout>
   </item>
  </layout>
 </widget>
 <resources/>
 <connections>
  <connection>
   <sender>clearButton</sender>
   <signal>clicked()</signal>
   <receiver>list</receiver>
   <slot>clear()</slot>
   <hints>
    <hint type="sourcelabel">
     <x>316</x>
     <y>286</y>
    </hint>
    <hint type="destinationlabel">
     <x>145</x>
     <y>194</y>
    </hint>
   </hints>
  </connection>
 </connections>
</ui>
editdialog.ui
<?xml version="1.0" encoding="UTF-8"?>
<ui version="4.0">
 <class>EditDialog</class>
 <widget class="QDialog" name="EditDialog">
  <property name="geometry">
   <rect>
    <x>0</x>
    <y>0</y>
    <width>374</width>
    <height>109</height>
   </rect>
  </property>
  <property name="windowTitle">
   <string>Editor</string>
  </property>
  <layout class="QGridLayout" name="gridLayout_2">
   <item row="0" column="0">
    <layout class="QGridLayout" name="gridLayout">
     <item row="0" column="0">
      <widget class="QLabel" name="nameLabel">
       <property name="text">
        <string>Name:</string>
       </property>
       <property name="buddy">
        <cstring>nameEdit</cstring>
       </property>
      </widget>
     </item>
     <item row="0" column="1">
      <widget class="QLineEdit" name="nameEdit"/>
     </item>
     <item row="1" column="0">
      <widget class="QLabel" name="numberLabel">
       <property name="text">
        <string>Number:</string>
       </property>
       <property name="buddy">
        <cstring>numberEdit</cstring>
       </property>
      </widget>
     </item>
     <item row="1" column="1">
      <widget class="QLineEdit" name="numberEdit"/>
     </item>
    </layout>
   </item>
   <item row="1" column="0">
    <spacer name="verticalSpacer">
     <property name="orientation">
      <enum>Qt::Vertical</enum>
     </property>
     <property name="sizeHint" stdset="0">
      <size>
       <width>20</width>
       <height>5</height>
      </size>
     </property>
    </spacer>
   </item>
   <item row="2" column="0">
    <widget class="QDialogButtonBox" name="buttonBox">
     <property name="orientation">
      <enum>Qt::Horizontal</enum>
     </property>
     <property name="standardButtons">
      <set>QDialogButtonBox::Cancel|QDialogButtonBox::Ok</set>
     </property>
    </widget>
   </item>
  </layout>
 </widget>
 <tabstops>
  <tabstop>nameEdit</tabstop>
  <tabstop>numberEdit</tabstop>
  <tabstop>buttonBox</tabstop>
 </tabstops>
 <resources/>
 <connections>
  <connection>
   <sender>buttonBox</sender>
   <signal>accepted()</signal>
   <receiver>EditDialog</receiver>
   <slot>accept()</slot>
   <hints>
    <hint type="sourcelabel">
     <x>227</x>
     <y>91</y>
    </hint>
    <hint type="destinationlabel">
     <x>157</x>
     <y>100</y>
    </hint>
   </hints>
  </connection>
  <connection>
   <sender>buttonBox</sender>
   <signal>rejected()</signal>
   <receiver>EditDialog</receiver>
   <slot>reject()</slot>
   <hints>
    <hint type="sourcelabel">
     <x>295</x>
     <y>91</y>
    </hint>
    <hint type="destinationlabel">
     <x>286</x>
     <y>100</y>
    </hint>
   </hints>
  </connection>
 </connections>
</ui>
编程方面明天不再更新了,要好好复习考研,虽然说这不是第一次提醒自己了...